
Home
About Us
Additives
Ingredients
Instructions
Recipes
Creating Recipes
Links
Contact
Faqs
Lye Safety
Molds
Coloring Soap
Troubleshooting
Packaging Soap
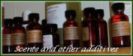
Essential oils are wonderful, but should be researched extensively before adding them to your products. As wonderful as they are, some essential oils are highly toxic, irritating, or sensitizing.
They are all extremely volatile with powerful constituents. Request a material data sheet from a supplier if in doubt. You can never be too “safe” and it may encourage suppliers to add information on a product with every order or at least have it available on the supplier site.
Coloring Soap
For those of you who want to add color to your soaps, but want to stay “natural”.
Oils and their Properties
For a description of the most commonly used oils in soapmaking, visit our Ingredients Page.
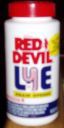
Red Devil Lye (Labeled 100% sodium hydroxide or Lye) is usually readily available at your local grocery store.
Caution! Cold process soapmaking can be addictive. Ask any soapmaker you come across and they’ll tell you. Once you’ve tried it and you’re successful, you’ll almost always want to do it again. These natural luxury soaps make bathing and washing up an absolute pleasure. Cold Process Soapmaking involves chemistry and almost every ingredient you choose carries it’s own benefit to your soap. Once you research the properties of all the potential ingredients out there (oils, butters, waxes, additives, etc), there are no limits to what you can produce much to the delight of yourself, friend, and family members.
SOAPMAKING PROCESS
Safety First
As a rule, you should gather your safety supplies and equipment first as this will always be your most important consideration.
Rubber gloves, goggles, a breathing mask, adequate clothing and heavy apron are among the most commonly used safety equipment and materials.
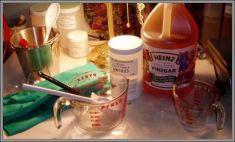
Prepare a spritzer of approximately 30% vinegar and 70% water. Vinegar neutralizes lye so it will come in handy to remedy a spill or splash on your skin or work area. Keep plenty of apple cider vinegar near at cleanup time when you are washing your mixing vessels and implements. Cover any work surfaces that might be affected with plastic, freezer paper, or newspaper.
Equipment and Supplies
Gather the remainder of your equipment and supplies. We use an accurate digital scale, stainless steel stockpot, Pyrex (heat resistent) measuring cups – one 4-cup and one 2-cup, heavy plastic spoons, meat and candy thermometers, three stick blenders, rubber spatula, freezer paper, wood mold, and if necessary, a heavy plastic bowl to house an ice bath for a quick method to cooling your lye solution.
If you must use glass, use heavy-duty heat resistant glass. Never use aluminum or iron as it will react negatively with the lye. Equipment made of stainless steel, heavy plastic, procelain and/or heavy, heat resistant glass are most commonly used in soapmaking.
Formula – Recipe
Assuming that you already have a recipe or an idea of what oils you want in your formulation, run the recipe or selected oils through an on-line lye calculator (see Links Page). If possible, print out a copy of the calculated results to add notes to for future reference or write them on a piece of paper or a notebook. For instance if you add anything at trace, you should record what effect, if any occurred as a result of a reaction to the lye. Write down the date your batch is cut and set out to cure. In short, anything you feel you might want to refer to later – write it down.
Remember, as an added safety measure, double check that the amount of lye you will be adding is correct. Use a value that has been discounted between 5 and 10%. A 0% discount will require exact measurements and is more apt to fail. A larger discount percentage leaves room for error and increases the chance of a successful batch considerably. We save the recipe pages created using the online lye calculator at Cranberry Lane. The measure of lye is in the yellow box at the top and the measure of oils are in the yellow box at the bottom. The amount of distilled or purified water required is at the very bottom of the page.
Prepare your Mold
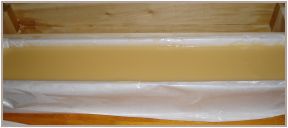
Prepare your mold in advance and place it nearby where it will be conveniently available in the event it becomes necessary to pour your batch in quickly. The mold we use is a handmade wooden loaf mold lined with freezer paper as shown. Freezer paper is great for easy removal of the finished soap from the mold as you can unwrap the sides and lift it right out. It is also snap to peel it off the loaf without the assistance of a lubricant. It can be used as a cutting surface when the soap is ready to be cut into bars. We made two molds (approximately 20 bars per mold) from pre-cut poplar purchased at the local hardware store. The total cost of materials was $17 for both molds. Pictures and instructions can be found here. We also use freezer paper to protect work surfaces from any drips or spills that might occur. I guess you can call it a multi-purpose material.
Gather your oil ingredients
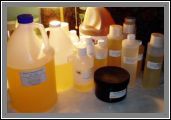
Gather oils and other ingredients that are listed on your formula or recipe. Pictured here are avocado oil, castor oil, palm kernel oil, tallow, pomace olive oil, sunflower oil, grapeseed oil, palm oil and a few more. We have added as many soapmaking supplier links as we could find and we recommend that you shop around for the best deals on good quality oils. Different suppliers carry different ingredients, so if you are looking for a particular ingredient, it is probably out there somewhere. If you must receive supplies and ingredients via mail-order, look for suppliers that are close to your area to save on shipping costs. Find out what suppliers charge for shipping before you commit to purchasing oils. Shoot for free shipping whenever you can.
Process lye solution or oils first?
The next step depends on whether or not the lye will be added to milk or plain water. If it will be water-based, we process the lye solution first and set it aside to cool before processing the oils – see step below. If it will be milk-based, the oils are measured, heated, and set aside to cool before processing the lye solution – see step below. Weigh out your lye slowly and carefully using an accurate scale.
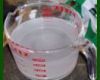
Water Based Only – For a water and lye recipe (without milk), we first measure the correct amount of chilled distilled water into the 4-cup heat resistant Pyrex (see photo). With rubber gloves on, we weigh out the lye into the 2-cup heat resistant Pyrex measuring cup. Then, we clip a meat thermometer to the 4-cup Pyrex so we can monitor the temperature. In a well-ventilated area with a stable work surface, we pour the lye into the water (never the other way around) and stir with a heavy plastic spoon until it is completely dissolved.
Your once chilled water will experience a rapid rise in temperature in excess of 160°F almost immediately. It will temporarily put off fumes while the reaction is the strongest. It is wise to use a mask if your face will be anywhere near the lye solution at this time, but within minutes it will settle down. Similar to using an oven cleaner, the fumes can be overpowering at first. Place your lye solution in a well-ventilated area where it is safe from through-traffic and allow it to cool. Keep a close eye on your lye solution until it has been turned to soap and is no longer a risky substance to have around.
Milk Based – For the majority of our milk based recipes, the oils are measured, melted and set aside to cool before the milk and lye are processed. This is for formulations where you have already frozen the milk or milk/water to the consistency of slush. The milk will be cold enough to stave off the otherwise rapid rise in temperature that normally burns or curdles the milk and it will also cool more rapidly. Since you’ve already melted the oils and set them aside to cool, the lye-milk mixture should catch up to the desired temperature much sooner.
Based on our experience with this method, the ultimate temperature of the milk/lye solution will range anywhere between 90°-130°F. By then, the oils will have cooled to the desired temperature and mixed with the lye solution right away. Believe it or not, this process is actually faster than the water/lye process. It is also a bit more pleasant because it doesn’t go the extreme rapid rise in temperature and doesn’t produce as much of the heavier fumes we mentioned earlier. In fact, we usually process the frozen milk and lye right in the kitchen sink. The ice bath is an added safety measure, but is not always necessary.

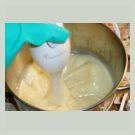
Where the ice bath is necessary is with another method of incorporating milk with lye that we use. This method takes a little longer, but is no less effective. It involves the slow introduction of lye into pre-chilled milk in a container that has been placed amidst an ice bath as shown in the photo. The meat thermometer has been clipped to the measuring cup to closely monitor the temperature as each little bit of lye is added. Your goal is to make sure that the temperature does not go above 130F or below 80F. The ice bath helps to cool the mixture as you continue to add lye while consitently stirring. As in the other method, once you have finished incorporating the lye into the milk, the oils are usually cooled to about the same temperature and they can be mixed together right away.
When the milk and lye solution is prepared this way, finished soaps are usually a very light tan in color.
Measure oils

Measure fats and oils into your “melting” container. Again, we use a stainless steel stockpot. We usually place the stock pot on the scale and zero it out to add the first ingredient. The remainder of the oils are then added one by one and the scale is zeroed out each time a new oil is added. You may need a knife or other sharp object to loosen more solid oils such as palm kernel. Some can be poured, while others must be scooped, depending on consistency. Weigh out your ingredients slowly and carefully to ensure the right proportions.
Melt Oils
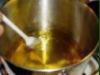
Clip a candy thermometer to the side of your pot and heat your oils – slowly at a low temperature. Most oils are sufficiently melted at between 130-160F, depending on chosen ingredients. As soon as the oils have dissolved (see photo), remove from heat and set aside to cool. If you want to cool your oils more quickly, set your container in a bath of cold water and stir until the desired temperature is reached. Placing your container in ice water may be even faster, but may also cause the solid or semi-solid oils to revert back to their original state and you’ll have to reheat them.
Mix Oils with Lye
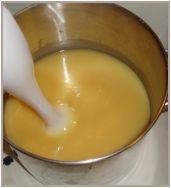
This is where the lye solution is poured into the oils and a stick blender is used to take them into quick saponification. Stick blenders are the ultimate time savers in soapmaking, but they have a tendency to burn out too easily. Our solution was to purchase three hand blenders to be operated consecutively during this process. Each blender is only used for a few minutes or until “warm, not hot” before another takes over. Normally, three blenders that work for a minute or so each is sufficient to reach trace right away. No more burnt out motors and a total of approximately five to ten minutes. While buying three blenders at once might seem extreme, you will end up buying three anyway to replace the ones that burn out. I find that they last considerably longer this way.
Reaching Trace
See how the batch has thickened and trace is evident? This is the point where all your hard work is nearly done and the mixture is ready to pour into your prepared mold. We use the rubber spatula here to scrape the mixture from the sides of the container into the mold. At this point, you will either insulate the mold or not. If it is a milk-based soap or if it contains honey – or both, it will not require insulation. Milk and honey are ingredients that will cause your batch to heat up sufficiently on its own during the gel stage.
Gel Stage
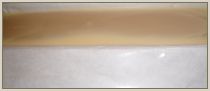
As you can see, the pretty pudding-like mixture is currently going through the gel stage where it heats up internally to complete the saponification process. Once cooled, it will be ready to cut into bars and set up to cure for 4-6 weeks and that’s really all there is to it anymore, besides cleanup. Curing your soap makes for a milder, harder bar with sufficient time for any remaining moisture to evaporate.
Cleanup Time
A very important practice in soapmaking is to remove all traces of lye when you have finished crafting a batch of soap, except for what is being stored in its original container. If you practice safety when working with lye, it becomes less intimidating, but is no less dangerous. When we’re finished with a batch of soap, we gather every implement and piece of equipment together (that will fit) and place them inside the stock pot. I pour a generous amount of vinegar into the stockpot along with some Dawn and water to neutralize any lye that might remain. Then, we wash everything we’ve used thoroughly. Never never leave lye or a lye solution out where it might be mistaken for a harmless substance. Our photo of lye and water mixed together indicates how easy it would be to mistake it for water. Taking proactive safety measures will eliminate or greatly minimize tragic accidents waiting to happen.